- жµПиІИ: 25043 жђ°
-

жЬАињСиЃњеЃҐ жЫіе§ЪиЃњеЃҐ>>
жЦЗзЂ†еИЖз±ї
з§ЊеМЇзЙИеЭЧ
- жИСзЪДиµДиЃѓ ( 0)
- жИСзЪДиЃЇеЭЫ ( 5)
- жИСзЪДйЧЃз≠Ф ( 0)
е≠Шж°£еИЖз±ї
- 2009-12 ( 1)
- 2009-11 ( 6)
- 2009-04 ( 1)
- жЫіе§Ъе≠Шж°£...
жЬАжЦ∞иѓДиЃЇ
-
tjlysпЉЪ
е•љеГПж≤°еЖЩеЃМпЉЯ
APACHE+TOMCATйЕНзљЃе§ЪеЯЯеРНе§ЪиѓБдє¶
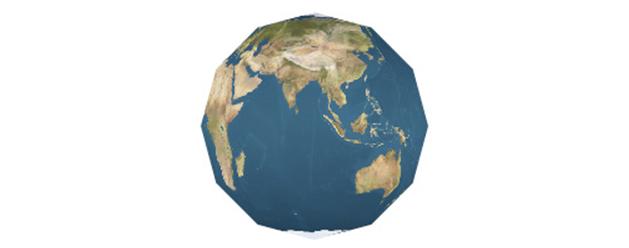
еЬ®жЭРиі®жХЩз®ЛзђђдЄАйГ®еИЖжИСдїђиЃ≤дЇЖзЇѓиЙ≤жЭРиі®дЄОзЇњж°ЖжЭРиі®пЉМињЩдЇЫжЭРиі®зЬЛдЄКеОїжХИжЮЬдЄНдљ≥гАВеЬ®жЬђзѓЗжХЩз®ЛйЗМдЄЇжИСдїђжПРдЊЫдЇЖжЫіе•љзЪДйАЙжЛ©---дљНеЫЊзЇєзРЖгАВдљњзФ®еЃГ3Dж®°еЮЛзЪДеЕЙељ±жХИжЮЬжЫіеК†йАЉзЬЯгАВ
ељУзДґињЩйЗМиѓі "йАЉзЬЯ"жШѓйТИеѓєflashзЪДйАЉзЬЯпЉМдЄОдЉЧе§ЪзЪДеЯЇдЇОеی嚥еН°зЪД3DжЄЄжИПжЭ•жѓФпЉМйАЉзЬЯдЄНеАЉдЄАжПРгАВдЄНињЗпЉМзО∞йШґжЃµпЉМйАЪињЗзїЩ3Dж®°еЮЛжЈїеК†еРИйАВзЪДдљНеЫЊзЇєзРЖзЪДз°ЃжШѓдЄ™дЄНйФЩзЪДеКЮж≥ХгАВ
еЕИеЖ≥жЭ°дїґ
жЬђжХЩз®ЛеїЇзЂЛеЬ®жИСдїђBasic09_BitmapMaterialExplorer.as) еИЂзЪДжХЩз®ЛеЯЇз°АдєЛдЄКгАВеБЗе¶Вдљ†жШѓflash3DиПЬйЄЯпЉМдљ†еПѓиГљдЉЪеЕИи¶БеОїзЬЛзЬЛињЩдЇЫжХЩз®ЛгАВдЄЊдЄ™дЊЛе≠РпЉМжЬЙдЇЫжЇРжЦЗдїґпЉМзВєеЗїйЩДеЄ¶зЪДasжЦЗдїґжЯ•зЬЛеЃГдїђжШѓе¶ВдљХеЈ•дљЬзЪДгАВжЙАжЬЙињЩдЇЫдЊЛе≠РйГљи¶БзФ®еИ∞дЄАдЄ™Cover.asжЦЗдїґгАВињЩдЄ™жЦЗдїґжШѓиЃ©жХЩз®ЛйЗМзФ®еИ∞зЪДflashељ±зЙЗдЄНиГљеРМжЧґеЈ•дљЬпЉМеР¶еИЩдЉЪжЛЦеЮЃдљ†зЪДзФµиДСгАВе¶ВжЮЬдљ†дЄНз°ЃеЃЪе¶ВдљХдљњзФ®ињЩдЇЫдЊЛе≠РпЉМжЯ•зЬЛињЩдЄ™жХЩз®ЛгАВ
жХЩз®ЛйЗМзЪДдЄАйГ®еИЖдЊЛе≠РдЉЪзФ®еИ∞"зЇєзРЖ"гАВеЕ≥дЇОзЇєзРЖдЄОжЭРиі®жИСдїђдЉЪеЬ®еРОиЊєжХЩз®Лиѓ¶зїЖдїЛзїНпЉМе¶ВжЮЬи¶БиЃ©дї£з†БеЬ®flash cs3йЗМеЈ•дљЬпЉМ иѓїињЩдЄ™жХЩз®Л.
дЄЇдЇЖе§ІдљУдЄКиЃ©е§ІеЃґеѓєдљНеЫЊзЇєзРЖиГљиЊЊеИ∞зЪДжХИжЮЬеБЪдЄАдЄ™дљУй™МпЉМе§ІеЃґзЬЛдЄЛдЊЛе≠РпЉМеЬ®ељ±зЙЗдЄКзВєеЗїдЉЪзЬЛеИ∞йЪПжЬЇзЪДдљНеЫЊзЇєзРЖгАВ
(
дљНеЫЊзЇєзРЖеЯЇз°А
еЬ®е§ЪдЄ™дљНеЫЊжЭРиі®дЄ≠BitmapFileMaterialжШѓжЬАжШУдљњзФ®зЪДгАВеЃГиГљдїОдЄАUrlдЄЛиљљдљНеЫЊеєґеЬ®дЄЛиљљеЃМжИРеРОжШЊз§ЇгАВдљЖдЄНжШѓиЗ™еК®жШЊз§ЇпЉБдЄЇдЇЖдљНеЫЊиГљжЬАзїИжШЊз§ЇеЗЇжЭ•жИСдїђзЪДиЃ©"иІЖеП£"жѓПеЄІињЫи°МжЄ≤жЯУгАВиЃ©жИСдїђзЬЛзЬЛеЃЮзО∞жЦєж≥ХпЉЪ
1.var earthMaterial:BitmapFileMaterial = new
BitmapFileMaterial("http://www.flashmagazine.com/articlefiles/away3d/resources/earthmap1k.jpg");
2.var sphere:Sphere = new Sphere({material:earthMaterial});
3.view.scene.addChild(sphere);this.addEventListener(Event.ENTER_FRAME,update);
жИСдїђеЕИеїЇзЂЛдљНеЫЊжЭРиі®еєґжККињЩдЄ™жЭРиі®еБЪдЄЇеПВжХ∞дЉ†зїЩзРГзЪДжЮДйА†еЗљжХ∞гАВељУзДґжИСдїђдєЯеПѓдї•е∞Жsphere.materialиµЛеАЉдЄЇиѓ•жЭРиі®гАВзДґеРОжККзРГжЈїеК†еИ∞иИЮеП∞еєґжѓПеЄІи∞ГзФ®"update"еЗљжХ∞гАВ"update"еЗљжХ∞йЭЮеЄЄзЃАеНХпЉМдїЕеѓєиІЖеП£ињЫи°МжЄ≤жЯУпЉЪ
1.private function update(e:Event):void{    view.render();}
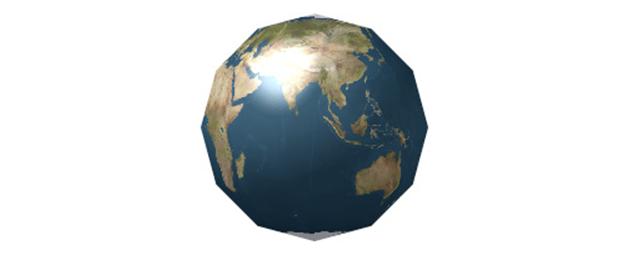
дљ†еПѓдї•жµПиІИеЃМжХізЪДдї£з†Б(Basic09_BitmapFileMaterial.as)пЉМдљЖињЩж†ЈеБЪжЬЙдЄ™зЉЇзВєе∞±жШѓдљНеЫЊж≤°дЄЛиљљеЃМдєЛеЙНж≤°жЬЙдїїдљХдЄЬи•њгАВжЙАдї•дљ†еПѓдї•дљњзФ®LoadSuccessдЇЛдїґгАВињЩж†ЈжИСдїђеПѓдї•еЕИеїЇдЄ™еЄ¶жЈ°иУЭиЙ≤зЪДйҐЬиЙ≤жЭРиі®зЪДзРГпЉМз≠ЙдљНеЫЊдЄЛиљљеЃМжИРеРОеЖНиЃЊзљЃиѓ•дљНеЫЊдЄЇињЩдЄ™зРГзЪДжЭРиі®гАВ
1.sphere = new Sphere({material:"lightblue"});view.scene.addChild(sphere);
2.view.render();
зДґеРОжЦ∞еїЇдЄАBitmapFileMaterialпЉМеєґдЄЇеЃГжЈїеК†дЊ¶еРђеЩ®пЉМдЊ¶еРђжШѓеР¶дЄЛиљљжИРеКЯпЉЪ
1.earthMaterial = new BitmapFileMaterial("http://www.flashmagazine.com/articlefiles/away3d/resources/earthmap1k.jpg");
2.earthMaterial.addEventListener(LoaderEvent.LOAD_SUCCESS,setMaterial);
дЄЛиљљеЃМжИРеРОпЉМswfе∞Жи∞ГзФ®setMaterialжЦєж≥ХпЉМжЙАдї•жИСдїђињШи¶БињЩж†ЈеБЪпЉЪ
1.private function setMaterial(e:Event):void{    sphere.material = earthMaterial;
2.    view.render();}
дљ†еПѓдї•зЬЛзЬЛеЃМжХізЪДжЦЗдїґ(Basic09_BitmapFileMaterial2.as).ињЩж†ЈеБЪе•ље§ДжШѓдЄНйЬАи¶БжѓПеЄІйГљи¶БжЙІи°Мview.render()
е±ЮжАІжИСдїђеПѓдї•еЊИеЃєжШУиЃњйЧЃеИ∞жЮДжИРдљНеЫЊжЭРиі®зЪДдљНеЫЊжХ∞жНЃгАВ
1.var myBitmap:BitmapData = earthMaterial.bitmap
ељУдљ†жГ≥еѓєеЇФзФ®дљНеЫЊжЭРиі®еРОеЖНеОїжФєеПШиѓ•жЭРиі®зЇєзРЖйЭЮеЄЄжЬЙзФ®гАВ
еП¶е§ЦињШжЬЙдЄАзІНдљњзФ®еЖЕеµМзЇєзРЖдљНеЫЊзЪДжЭРиі®гАВељУзДґй¶ЦеЕИдљ†и¶БзЯ•йБУе¶ВдљХеЬ®дљ†жЙАдљњзФ®зЪДзЉЦиЊСеЩ®йЗМеµМеЕ•дљНеЫЊгАВдЄЛйЭҐдї£з†БжШѓзФ®дЇОFlex Actionscript й°єзЫЃгАВеБЗе¶Вдљ†дљњзФ®зЪДжШѓFlash Cs3пЉМиѓЈиѓїearthmap1k.jpg"еИ∞еЇУпЉМеєґеП≥еЗїеѓЉеЕ•жЦЗдїґпЉМйАЙжЛ©"Export for Actionscript"пЉМзДґеРОеЬ®з±їеРНз©ЇйЗМе°Ђ"earthBitmap".ињЩж†ЈжИСдїђе∞ЖжПТеЕ•зЪДдљНеЫЊдЉ†йАТзїЩзРГзЪДеИЭеІЛеМЦеЗљжХ∞еєґеЇФзФ®дљНеЫЊжЭРиі®гАВ ињЩзѓЗжХЩз®ЛгАВ е¶ВжЮЬдљ†дљњзФ®зЪДжШѓFlex BuilderжИЦFlash Cs4 пЉМдљ†еП™и¶БдЄЇжѓПдЄ™дї£з†Бз§ЇдЊЛдЄЛиљљзЫЄеЇФзЪДдљНеЫЊжЦЗдїґеИ∞еСљеРНдЄЇresourcesзЪДе≠РжЦЗдїґе§єе∞±е•љдЇЖгАВ
еЬ®Flex BuilderпЉМдЄАиИђжПТеЕ•дљНеЫЊзЪДж†ЗиЃ∞жФЊеЬ®з±їеЃЪдєЙдєЛеЙНгАВ
1.[Embed(source="resources/earthmap1k.jpg")]private var earthBitmap:Class;
Flash CS4 дєЯиГљеГПдЄКиЊєйВ£ж†ЈдљњзФ®Embedж†Зз≠ЊпЉМиАМеЬ®Flash Cs3йЗМдљ†и¶БеѓЉеЕ•"
1.var sphere:Sphere = new Sphere({material:earthBitmap});
еЃМжХізЪДFlex Builder/Cs4дї£з†БпЉЪ(Basic09_BitmapMaterial.as)пЉМFlash CS3 FLA жЦЗдїґ(Basic09_BitmapMaterial.fla) пЉМињЩдЄ™FLAжЦЗдїґдєЯеЬ®жЧґйЧізЇњдЄКжЈїеК†Away3Dдї£з†БзЪДдЊЛе≠РгАВз°ЃдњЭAway3dжЇРжЦЗ俴襀жЛЈиіЭеИ∞дЇОflaжЦЗдїґеЬ®еРМдЄАжЦЗдїґе§єеУЯгАВ
If you don't want to use the init-object, so to declare the same using the more declarative syntax. First you'll need to import one of the classes:е¶Вдљ†дЄНжГ≥еЬ®еИЭеІЛеМЦ3DзЙ©дљУеЗљжХ∞йЗМиЃЊзљЃдљНеЫЊжЭРиі®пЉМйВ£дљ†йЬАи¶БжЫіе§ЪзЪДиѓ≠ж≥ХпЉМй¶ЦеЕИи¶БеѓЉеЕ•Away3D utilityз±їпЉЪ
1.import away3d.core.utils.Cast;
дєЛеРОпЉМдљњзФ®еѓЉеЕ•зЪДCastз±їеЃЮдЊЛеМЦдљ†зЪДдљНеЫЊпЉЪ
1.var earthMaterial:BitmapMaterial = new BitmapMaterial( Cast.bitmap(earthBitmap) );
2.var sphere:Sphere = new Sphere();sphere.material = earthMaterial;
3.view.scene.addChild(sphere);view.render();
е¶ВдЄКиѓ≠ж≥ХзєБзРРпЉМдЄНињЗињЩдЄ™иѓ≠ж≥ХеПѓйАЪзФ®дЇОFlexдЄОFlash Cs3 гАВAsз±їпЉЪ (Basic09_BitmapMaterial2.as) FLAпЉЪ ()
ж≥®жДПпЉЪе¶ВжЮЬдљ†зЪДдї£з†БеП™зФ®дЇОFlex BuilderпЉМдљ†еПѓдї•дљњзФ®"ж†ЗеЗЖзЪД"嚥еЉПпЉЪ
1.var earthBitmapData:BitmapData = Bitmap( new earthBitmap() ).bitmapData;
2.var earthMaterial:BitmapMaterial = new BitmapMaterial( earthBitmapData );
Away3D жФѓжМБжЙАжЬЙFlashжФѓжМБзЪДеЫЊзЙЗж†ЉеЉПпЉМжЙАдї•Away3DдЄАж†ЈжФѓжМБ PNGжШЊз§ЇйАПжШОеМЇеЯЯгАВ This can be used to achieve interesting effects such as animating skies above the earthињЩеПѓдї•иЃ©жИСдїђеЃЮзО∞дЄАдЇЫжЬЙиґ£зЪДжХИжЮЬжѓФе¶ВеЬ∞зРГдЄКзЪДеПШеєїиОЂжµЛзЪД姩穯 (зЬЛињЩдЄ™дЊЛе≠РPhongColorMaterialдЊЛе≠РгАВеП¶е§ЦдєЯжЬЙдЄАдЄ™зФ®MovieClipsдљЬзЇєзРЖзЪДжЦєж∞ПжЭРиі®пЉЪ PhongMovieMaterial пЉМињЩдЄ™жЭРиі®дЄОеЙНйЭҐжЙАжЬЙжЦєж∞ПжЭРиі®зФ®ж≥ХдЄАж†ЈпЉМеРМж†ЈдєЯйЬАи¶БдЄАдЄ™еЕЙжЇРгАВEarth and Heaven tutorial).
зФµељ±еЙ™иЊСзЇєзРЖ
дљ†ињШеПѓзФ®зФµељ±еЙ™иЊСеБЪдЄЇзЇєзРЖгАВињЩдЄ™дЊЛе≠РйЗМжИСдїђи¶БзФ®еИ∞дЄАдЄ™еРНдЄЇ"caustics.fla"зЪДAway3DзЪДDemoжЦЗдїґпЉМдЄАдЄ™зФ®еК®жАБзЇєзРЖзЪДзЪДзРГгАВеЖНжђ°зљЧеЧ¶дЄЛзФ®дЄНеРМеЉАеПСеЈ•еЕЈеѓЉеЕ•жЦєеЉПдєЯдЄНзЫЄеРМпЉМеЬ®FlexBuilderйЗМпЉМеѓЉеЕ•дЄАдЄ™SWFж†ЉеЉПзЪДзФµељ±еЙ™иЊСи¶БињЩж†ЈпЉЪ
1.[Embed(source="resources/caustics.swf", symbol="caustics")]
2. private var causticsMovie:Class;
еЬ®Flash CS3, еП≥еЗї MovieClipйАЙжЛ© "Export for Actionscript" еєґиЃЊзљЃеЕґз±їеРНдЄЇ "causticsMovie". дєЛеРОеЬ®дЄ§дЄ™еЈ•еЕЈйЗМдї£з†БйГљжШѓдЄАж†ЈзЪД:
1.var materialMovie:MovieClip = new causticsMovie() as MovieClip;
2.var causticsMaterial:MovieMaterial = new MovieMaterial( materialMovie );
3.var sphere:Sphere = new Sphere({material:causticsMaterial});
4.view.scene.addChild(sphere);
AS: (Basic09_MovieMaterial.as) FLAпЉЪ (Basic09_MovieMaterial.fla)
е¶ВжЮЬињЩдЄ™зФ®дЇОзЇєзРЖзЪДзФµељ±еЙ™иЊСжШѓеПѓдї•дЇ§дЇТзЪДпЉМйВ£еЬ®3DйЗМдїНзДґеПѓдї•дЇ§дЇТгАВдљ†еП™и¶БињЫи°Ме¶ВдЄЛиЃЊзљЃе∞±еПѓдї•дЇЖгАВ
1.earthMaterial.interactive = true;
ж≥®жДП:дљњзФ®FlexзЪДиѓЭ, дљ†ињШеПѓдї•зФ®Flex зїДдїґдљЬдЄЇзЇєзРЖеєґдїНеПѓдї•дЇ§дЇТ.пЉМзЬЛињЩдЄ™дЊЛе≠Р гАВељУзДґдєЯеПѓдї•еУНеЇФдЇЛдїґ. дЄЛйЭҐжИСдїђдЄЇж±ВжЈїеК†дЄАдЄ™йЉ†ж†ЗзВєеЗїдЇЛдїґ:
1.sphere.addEventListener(MouseEvent3D.MOUSE_DOWN,sphereClick);
дЄЛйЭҐдї£з†БеЃЮзО∞зВєеЗїзРГжЧґзФµељ±еЙ™иЊСпЉМжОІеИґзФµељ±еЙ™иЊСжТ≠жФЊжИЦеБЬж≠ҐгАВ
1.private function sphereClick(e:MouseEvent3D):void{    if(isMaterialPlaying){
2.        materialMovie.stop();        isMaterialPlaying = false;    } else {
3.        materialMovie.play();        isMaterialPlaying = true;    }}
AS (Basic09_MovieMaterial2.as) FLAпЉЪ (Basic09_MovieMaterial2.fla).
Movie:зВєеЗїиІВзЬЛ
Getting fancy with Phong shading
ж≠£е¶ВйҐЬиЙ≤жЭРиі®йВ£ж†ЈпЉМдљНеЫЊжЭРиі®дєЯжЬЙжЦєж∞ПйШіељ±жЭРиі®зЪДзЙИжЬђпЉЪPhongBitmapMaterialпЉМеИЫеїЇPhongBitmapMaterialдЄОеИЫеїЇжЩЃйАЪзЪДдљНеЫЊжЭРиі®дЄАж†ЈгАВ
1.var earthMaterial:PhongBitmapMaterial = new PhongBitmapMaterial( Cast.bitmap(earthBitmap) );
2.var sphere:Sphere = new Sphere({material:earthMaterial});
3.view.scene.addChild(sphere);
дЄОеЙНйЭҐColorMaterialsйВ£ж†ЈпЉМPhongBitmapMaterialењЕй°їеЬ®еЬЇжЩѓдЄКйЕНдЄКдЄАдЄ™еЕЙжЇРгАВж≤°жЬЙзЪДиѓЭпЉМеЬ®жЄ≤жЯУжЧґе∞±дЄНдЉЪеЕЙељ±жХИжЮЬпЉМеТМжЩЃйАЪдљНеЫЊжЭРиі®ж≤°дїАдєИдЄНеРМгАВ
1.var light:DirectionalLight3D = new DirectionalLight3D();
2.view.scene.addChild(light);
3.// Move the light away from the default 0,0,0 position so we'll see some reflection
4.light.y = 500;light.x = -300;light.z = -200;
(Basic09_PhongBitmapMaterial.as)
дЄЇдЇЖдљУй™Мambient, diffuseеТМspecularдЄЙе±ЮжАІеѓєеЕЙељ±дЇІзФЯзЪДељ±еУНжИСдїђеПѓдї•еЫЮй°ЊдЄЛеЙНйЭҐжХЩз®ЛйЗМдЄАдЄ™
1.var causticsMaterial:PhongMovieMaterial = new PhongMovieMaterial( new causticsMovie() as MovieClip );
2.var sphere:Sphere = new Sphere({material:causticsMaterial});
еє≥йУЇдљНеЫЊ
A bitmap tile is an image that can be repeated without the seams showing. By using a small repeatable image of grass, you'll be able to portray an entire lawn without adding gigantic images to your application. To tile an image, you'll need to use a special material called the TransformBitmapMaterial. The following code will create a transform-material and set it to be repeated 5 times across the objects surface:зФ®дЇОеє≥йУЇзЪДдљНеЫЊеЕґдЇ§жО•е§Ди¶БзЬЛдЄНеЗЇжО•зЉЭгАВињЩж†ЈзФ®дЄАеЉ†иНЙзЪДдљНеЫЊе∞±еПѓдї•еє≥йУЇеЗЇдЄАдЄ™иНЙеЭ™пЉМеЗПе∞ПжЦЗдїґзЪДе∞ЇеѓЄгАВеє≥йУЇдљНеЫЊзФ®TransformBitmapMaterialгАВдЄЛйЭҐзЪДдї£з†БеИЫеїЇдЄАдЄ™TransformBitmapMaterialеєґиЃЊзљЃеЬ®3DзЙ©дљУи°®йЭҐеє≥йУЇ5дљНеЫЊ
1.var transformedMaterial:TransformBitmapMaterial = new TransformBitmapMaterial( image.bitmapData );
2.transformedMaterial.repeat = true;transformedMaterial.scaleX = 0.2;
3.transformedMaterial.scaleY = 0.2;
дљ†ињШеПѓдї•еБПзІїеТМжЧЛиљђжЭРиі®:
1.transformedMaterial.offsetX = 25;transformedMaterial.offsetY = 25;
2.transformedMaterial.rotation = 5;
(Google "3d texture maps" you'll find hundreds of sites offering bitmap textures. The general rule is that you'll get what you pay for. Finding free textures that are high quality takes time, so for many it'll be cheaper to just buy them. Many sites offer pre made collections of textures for various purposes. Bricks, crates, wood, water, metal and all other possible materials are found in these packages so they can take you far. Basic09_BitmapMaterialExplorer.as)
дљ†дЄНиГље∞ЖињЩзІНжЭРиі®дЄОжЦєж∞ПйШіељ±жЈЈеРИдљњзФ®пЉМжИСдїђеПѓдї•зФ®жЫійЂШзЇІзЪДCompositeMaterialеЃЮзО∞пЉМCompositeMaterialдЉЪеЬ®еРОзї≠зЪДжХЩз®ЛйЗМжПРеИ∞гАВ
еҐЮеК†еПНиЙ≤еЕЙ- Environment materials
Be aware that reflective materials come at a cost when compared to bitmap materials. There is a slight CPU overhead to adding a reflection and a big overhead for refraction using the reflective plane that we'll discuss later in this tutorial.ињЩйГ®жХЩз®ЛжЬАеРОдЄАзІНжЭРиі®з±їеЮЛжШѓзОѓеҐГжЭРиі®гАВеЃГеПѓдї•еПНе∞ДеС®еЫізОѓеҐГзЪДеЕЙеТМзЙ©дљУгАВеЃЮжЧґеПНе∞ДеС®еЫізОѓеҐГи¶Бе§ІйЗПиЃ°зЃЧпЉМдљЖињЩйЗМжИСдїђи¶БиАНзВєжЙЛжЃµ----йАЪињЗдљњзФ®дЄАеЉ†зОѓеҐГеЫЊгАВ
Away3D has two materials that offer environment reflection, the EnviroColorMaterial and the EnviroBitmapMaterial. As you may have guessed by now - the first will use a color and the other will use a bitmap for texture. In addition they'll take a second parameter, a bitmap that will be used for the reflection.
1.var reflectiveMaterial:EnviroBitmapMaterial = new EnviroBitmapMaterial( Cast.bitmap( textureBitmap ), Cast.bitmap( reflectionBitmap ) );
2.reflectiveMaterial.reflectiveness = 0.3;
The reflectiveness property adjusts how much the reflection will "shine through" on the main material. You can adjust this from 0 (no reflection) to 1 (only reflection). One thing to note about reflections is that you only really see them when an object or the camera is moving. Another thing to note is that reflections work best on curved surfaces (not planes). Click and drag in the example below to see this.
(Basic09_EnviroBitmapMaterial.as)
When you move your mouse above the movie, the torus will start to rotate. When you click it, the rotation will stop and you can drag it around as you please. If you look carefully, you'll see that this isn't exactly how real reflections work, but it's more than good enough for realtime 3D.
Getting the best results
Flash 3D is only in it's infancy. In terms of performance and quality it is now where computer games were about 8 years ago. Based on that fact, it's a little unfair to compare Flash 3D to games on the Xbox360, PS3 or Wii. This is however what the end users will do, so what can you do to improve the look of your Flash 3D scene beyond the materials discussed here? There's several tricks and the key is most often in the materials.
Finding the right texture to use in your materials is the first step. If you
There's also software out there that will let you generate textures for your models. In our initial example where you could click to change materials, we have used some really high quality textures created with a PC software called Image Editor and used under a CC license. Look at how those stars shine :) Genetica. This software will allow you to create an endless amount of very high quality textures that can be "tiled".
After finding the right texture, the next step is to add more depth to your scene. Think about this - if you move around in an outdoor scenery (as in a FPS game), the shadows will always be in the same place since the sun isn't moving noticeably. This makes it possible to "pre-bake" the textures - adding the shadows onto the texture itself. If done right, this will make your 3D environment look really rich. The process of baking textures cannot be done in the 3D engine itself, but must be done in a modeling application (3DS MAX, Maya, Blender and many others) that support "baking" textures.
There's also two more kinds of materials in Away3D; the powerful Dot3 material and the CompositeMaterial that allow you to combine several materials into one. Both of these offer a lot of possibilities and we'll get back to them in separate tutorials later. As a teaser, look what the Dot3 material can do to the simple torso model below.
 
(Pedestal.as)
By adding a Dot3 bitmap material with a Normal Map, this simple model looks like it's built of thousands of polygons! Away3D even has a class to generate these Normal maps and also supports bump mapped surfaces.
Background image for article header was based upon an image by


- 2009-11-25 14:48
- жµПиІИ 3031
- иѓДиЃЇ(0)
- жЯ•зЬЛжЫіе§Ъ
еПСи°®иѓДиЃЇ

-
away3DеЯЇз°А6-йҐЬиЙ≤жЭРиі®
2009-11-25 14:53 1476еЬ®еЙНйЭҐзЪДжХЩз®ЛйЗМжИСдїђеЈ≤зїПжО•иІ¶еИ∞жЭРиі®гАВињЩзѓЗжХЩз®Ле∞ЖжОҐиЃ®е¶ВдљХдљњзФ®дЄАдЇЫеЯЇ ... -
Away3DеЃЮдЊЛжХЩз®Л - иііеЫЊпЉИDot3BitmapMaterialпЉЙ
2009-11-25 14:52 1645жЬђдЊЛеМЕеРЂзЪДеЖЕеЃєжЬЙпЉЪ normal map Dot3 ... -
Away3DеЃЮдЊЛжХЩз®Л - иііеЫЊпЉИEnviroBitmapMaterialпЉЙ
2009-11-25 14:51 1533жЬђзѓЗеМЕеРЂеЖЕеЃєпЉЪ 3DеЯЇжЬђеЕГзі† - еЬЖзОѓ зОѓеҐГдљНеЫЊжЭРиі® ... -
Away3dеЃЮдЊЛжХЩз®Л - иііеЫЊпЉИtexture mappingпЉЙ
2009-11-25 14:50 2602жЬђзѓЗдЉЪеМЕеРЂдї•дЄЛеЖЕеЃєпЉЪ еµМеЕ•е§ЦйГ®еЫЊзЙЗпЉИAway3DжФѓжМБ ...
зЫЄеЕ≥жО®иНР
Away3D4.0еЕ•йЧ®жХЩз®Л(1)--ињЩдЄ™дЄЦзХМзЪДеЯЇз°А Away3D4.0еЕ•йЧ®жХЩз®Л(2)--йВ£дЇЫиііеЫЊзЪДMethod Away3D4.0еЕ•йЧ®жХЩз®Л--еЯЇз°АжКАеЈІ Away3Dе≠¶дє† еЃЮдЊЛжХЩз®Л - иііеЫЊпЉИDot3BitmapMaterialпЉЙ еЃЮдЊЛжХЩз®Л - иііеЫЊпЉИEnviroBitmapMaterialпЉЙ еЃЮдЊЛ...
Away3D еЯЇз°АжХЩз®Л Flash 3d еЉАеПСењЕе§З
Away3D 4.1еЃШжЦєеЉАеПСеМЕпЉМflash 3DеЉАеПСеИ©еЩ®
flash 3DеЉХжУОгААaway3dжЇРз†Б flash 3DеЉХжУОгААaway3dжЇРз†Б flash 3DеЉХжУОгААaway3dжЇРз†Б flash 3DеЉХжУОгААaway3dжЇРз†Б flash 3DеЉХжУОгААaway3dжЇРз†Б flash 3DеЉХжУОгААaway3dжЇРз†Б
Away3dеЉХжУОеЯЇз°АжХЩз®ЛпЉМжЬЙеЃЮдЊЛеУ¶гАВ
жЬАжЦ∞away3D еЉХжУОеМЕжЬАжЦ∞away3D еЉХжУОеМЕжЬАжЦ∞away3D еЉХжУОеМЕжЬАжЦ∞away3D еЉХжУОеМЕжЬАжЦ∞away3D еЉХжУОеМЕжЬАжЦ∞away3D еЉХжУОеМЕжЬАжЦ∞away3D еЉХжУОеМЕ
Away3D 4.0.7.chm flash3DжКАжЬѓеЉАеПСжЙЛеЖМ
еЃМжХізЪДдї£з†БпЉМеПѓзЉЦиѓСињРи°МйАЪињЗгАВињРзФ®зЪДжШѓAway3D 4.06зЙИжЬђеЉХжУОпЉМжЇРз†БйЗМйЭҐжЬЙaway3d.swcдЇЖпЉМеЉХзФ®е∞±еПѓдї•зЉЦиѓСгАВ
Away3D еЯЇз°АжХЩз®Л,еѓєеИЭе≠¶иАЕжѓФиЊГжЬЙеЄЃеК©~пЉБеЄМжЬЫеѓє web3D зЪДжЬ™жЭ•еПСе±ХеБЪеЗЇдЄАзВєе∞Пе∞ПзЪДиі°зМЃ~пЉБ
Away3DдЄ≠жЦЗapi
Away3DжШѓFlashзЪД3DеЉХжУОпЉМињЩжШѓAway3D 3.6 Cookbook жХЩз®ЛжЇРз†Б
иЗ™еЈ±еИґдљЬзЪДaway3d3.6зЪДswcжЦЗдїґжЦєдЊње§ІеЃґдЄЛиљљдљњзФ®гАВaway3dзЪДеЃШзљСдЄКйЭҐж≤°жЬЙswcжЦЗдїґжПРдЊЫдЄЛиљљ
away3d4.1 еЉАжЇРдї£з†Б еЊИжЦєдЊњзЪДеХ¶еХ¶еХ¶
away3DеЉХжУОзЙ©дљУйЉ†ж†ЗжЛЦеК®з±їпЉМжЛЦеК®3DзЙ©дљУ
away3d
As3.0+Away3d+as3dmodиґЕзВЂ3DзЫЄеЖМ зЂЛдљУжДЯиґЕеЉЇ3Dз΃嚥зЫЄеЖМ жХИжЮЬпЉЪhttp://blog.csdn.net/he_wen_jian/article/details/21695711
еЃШжЦєзЪДAway3d4.1 SWCжЦЗдїґдЄНзЯ•йБУдЄЇдїАдєИдЄНиГљеК†иљљеИ∞Flash cs6дЄ≠гАВдЄЇж≠§пЉМжИСйЗНжЦ∞зЉЦиѓСдЇЖдЄАдЄЛжЇРжЦЗдїґгАВ
Away3DзЪДAPIAway3DзЪДAPIAway3DзЪДAPI
away3d4.1 chmжЦЗж°£иµДжЦЩзԱ楶姩жХізРЖ
Flash/FlexдЄКеЉЇе§ІзЪД3DеЉХжУОAway3DзЪДеЄЃеК©жЦЗж°£ зЙИжЬђ3.6.0 иЛ±жЦЗзЙИ